Backsplash | One Room Challenge: Week 7
Welcome back friends! It’s Week 7 of the One Room Challenge and the kitchen is finally starting to look like a kitchen! If you want to see how far we’ve come, check out the progress thus far:
Week 1: Kitchen Plans, Before Photos, and Mood Board
Week 2: Traditional Floorplan vs. Open Concept
Week 3: New Floors for an Old House
Week 4: Choosing Appliances
Week 5: IKEA Cabinets & Counters
Week 6: Lighting & Electrical
The last week has been the most impactful to date. My dad who is an absolute master of the putty knife, helped me get the walls smooth and I got everything primed and painted so we could install cabinets! The my family (the Level Headed Home Improvements crew) came down and we got almost all of the cabinet boxes installed! The backsplash is not up yet but I still wanted to take this chance to talk about it this week!
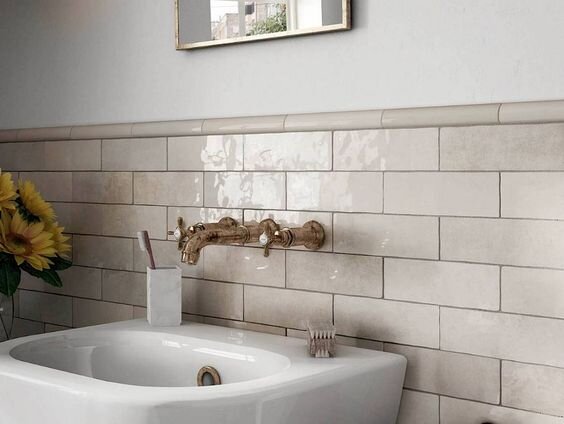
Much like everything else in the kitchen, I wanted something classic, timeless, warm, and neutral when it came to the backsplash. I really love white subway tile (I think it gets a bad rep for being overdone when really it’s one of the most timeless choices out there), but I used it in the bathrooms and wanted something a little warmer and more subtle here. I ordered a lot of tile samples to look at and while they were all quite different they had a common theme - I wanted the colour to be light and neutral to go with the cabinets and counters, so I looked at white, off-whites, and creams. I also wanted something just a little bit interesting. So I looked for neutral colours and textures with interesting shapes, or neutral colours and standard shapes with interesting textures.
In the end, I went with these beautiful zellige tiles that Tiles Inspired was able to source for me (I paid for them, but they helped me hunt them down!). I love that the shape is a classic rectangle and the colour is subtle, but the beautiful texture and the colour variation between tiles makes them interesting. I think the shades of cream and beige will be the perfect transition between the off-white shaker cabinets and the warm wood of the countertops.
I mentioned this at the beginning of the project, but I made a lot of compromises in this kitchen. While I do love everything I chose for the finished space, it’s not what I would have chosen if I knew we’d be staying in this house long term. I really love rich jewel tones, especially emerald green (see my dining room and workshop), so if this were my long-term kitchen I probably would have done dark green cabinets or a dark green backsplash. I didn’t think either of those options made sense for resale though, so I went more neutral, but I really wanted a pop of colour somewhere.
I’m building appliance garages into the two large pantry cabinets, and since they will have countertops in them, I didn’t want to leave them with just the flimsy backer board for backsplash. I ended up buying a little bit of extra zellige tile in the same style but in the green colour-way to tile the “backsplash” of each appliance garage. I think this will be the perfect little pop in there. Since the cabinets can be left open I’ll get to enjoy the colour, but if a future owner hates it they can just leave them closed! In the meantime though, here’s where we’re at!
Demo- Frame out the new pocket door
- Insulate and vapour barrier exterior wall
- New electrical, venting the range hood
- Replace drywall as needed & paint
- Replace/reinforce subfloor
- Lay underlayment
New floor tile & grout- Install cabinets
- DIY appliance garages
- Run new heating/cooling vent for kitchen, gas for the gas range,
electrical for the dishwasher, and water for fridge and dishwasher - Install counters
- Install and grout backsplash
- Install appliances
- Finishing touches
Even though I know I won’t be finished the whole kitchen next week, I do think I’m going to have something pretty awesome to show you! I really hope you’ll stay tuned for next week, and to see the finished kitchen a month or so from now! While you wait, follow me on Instagram for realtime updates, and check out all the other amazing projects over on the One Room Challenge blog!


